
| 일 | 월 | 화 | 수 | 목 | 금 | 토 |
|---|---|---|---|---|---|---|
| 1 | 2 | 3 | 4 | 5 | 6 | 7 |
| 8 | 9 | 10 | 11 | 12 | 13 | 14 |
| 15 | 16 | 17 | 18 | 19 | 20 | 21 |
| 22 | 23 | 24 | 25 | 26 | 27 | 28 |
| 29 | 30 | 31 |
- 안드로이드 스튜디오
- kotlin
- Hilt
- glide
- 안드로이드 스튜디오 JAVA
- 안드로이드로딩창
- 자바
- hilt오류
- include태그
- 안드로이드 스튜디오 API
- SpringBoot
- SpringWebFlux
- 데이터바인딩
- 종속항목삽입
- include이벤트처리
- 공공데이터포털리사이클러뷰
- 프론트엔드
- 리사이클러뷰
- 안드로이드스튜디오
- Today
- Total
내일은개발왕
안드로이드 스튜디오 - 리사이클러뷰를 이용해서 사용자가 입력한 값 대로 공공데이터 포털 API에서 결과값 가져오기 - (1) 본문
| ※ 주의사항 및 안내 1. 독학으로 진행하였기 때문에, 잘못된 부분이 있을 수 있습니다. 잘못된 부분은 언제든지 댓글로 피드백 해주세요. 빠르게 고치겠습니다. 2. 모르시는 부분이 있으시다면 언제든지 댓글을 남겨주세요. 제 힘이 닿는 곳까지 도와드리겠습니다. 3. 안드로이드 스튜디오를 설치 하셨다는 가정하에 진행합니다. 4. JAVA로 진행합니다. |
이번 프로젝트의 주요 기능 중 하나였다.
사용자로부터 값을 입력받는 것 까지는 어떻게든 하겠는데
그럼.. 값을 입력받은 후에 그 많은 값들을 어떻게 출력해주어야 하나?? 여기서 문제가 시작되었다.
이를 해결하기 위해 구글링을 했었고 값들을 받아올 때 마다 관련 화면을 출력하는 리사이클러뷰라는 기능이 있다는 것을 알게되었다. 이 기능은 굉장히 유용하다! 그래서 이를 이용해서 작업을 할 것 이다.
내가 잊지 않으려고 포스팅 하는 것도 있지만 프로젝트를 진행하며 많은 분들이 올려주신 포스팅이 정말 큰 도움이 되었기에 내 포스팅도 누군가에게 도움이 되었으면 하는 바램에 부족하지만 올려본다
이번 포스팅에선 사용자에게 값을 입력받는 화면 + JAVA로 소스코드 작성까지를 다루고 있다.
필요한 파일도 올려두었으니 필요한 분들은 다운로드 하시면 될 것 같다.
어떻게 구현을 할것인지 영상도 찍었는데.. 여기다가 업로드하면 이미지랑 겹친다. 왜지..?
따로 올려두었으니 확인하고 싶으신 분들은 확인하시면 될 것 같다.
1. UI 만들기 (User Interface)
화면은 총 3개, xml파일은 총 4개가 필요하다. 각 용도는 다음과 같다.
- 첫 번째, 사용자에게 값을 입력받기 위한 화면 (화면 생성시 자동으로 xml 파일 생성됨)
- 두 번째, 사용자에게 결과를 보여주기 위한 화면 (화면 생성시 자동으로 xml 파일 생성됨)
- 세 번째, 결과값이 없을 시 결과가 없다는 것을 보여주기 위한 화면 (화면 생성시 자동으로 xml 파일 생성됨)
- 네 번째, 리사이클러뷰로 사용할 xml 파일
이렇게 빈 파일을 만들었다면 첫번째로 값을 입력받는 화면을 만들어보자
1~3번째 파일은 아래와 같이 만들면 된다.

4번째 리사이클러뷰로 사용할 xml 파일은 아래처럼 만들면 된다.
파일명은 원하는 파일 이름(대문자로 작성하면 안된다!).xml으로 해야한다.
빈 화면을 만들었다면 아마 hello world가 있을것이다. 클릭해서 delete를 눌러 삭제해주자
그리고 올린 파일을 다운받았다면 거기에 있는 파일을 전부 복사한다음 아래 drawable에 붙여넣기 해준다. 그럼 이제 그 이미지를 사용할 수 있게된다.
참고로 이미지 이름은 변경해도 상관은 없지만, 절대로 대문자로 입력하면 안된다! 오류난다.

그럼 이제 준비가 끝났다. 화면을 먼저 구현 해보겠다.
1-1 ) 사용자에게 값을 입력받는 화면 만들어보기
사용자에게 입력받을 화면 xml 파일을 클릭하고, 바탕화면 색을 먼저 지정해 줄 것이다.
올린 파일중에 "ship_data_background" 라는 png 파일이 있을텐데 이것이 바탕화면이 될 파일이다.
소스코드를 아래와 같이 작성하자. 소스코드는 노란색으로 칠한 곳을 클릭해서 작성할 수 있다.

 xmlns:app="http://schemas.android.com/apk/res-auto"
    xmlns:tools="http://schemas.android.com/tools"
    android:layout_width="match_parent"
    android:layout_height="match_parent"
    android:fitsSystemWindows="true"
    android:background="@drawable/ship_data_background"
    tools:context=".MainActivity_ShipData"
1. android:background = "@drawable/ship_data_background"라는 소스코드가 drawable에 소속되어 있는 ship_data_backgorund 라는 이름의 파일을 가져와 이를 배경에 적용시켜 준다.
2. android:fitsSystemWindows = "true"도 작성해주자. 이 소스코드는 Toolbar를 이용하게 되면 화면이 겹치는 상태가 일어나는데, 상태바와 화면이 서로 겹치지 않도록 방지해주는 역할을 한다.
이렇게 바탕화면을 깔았으면 각 요소들을 추가하면 된다. 이번엔 툴바를 추가해보겠다. 여기서 툴바를 클릭해 끌어오자.

툴바를 끌어왔다면 이제 크기를 조정해 줄 것이다. 툴바를 클릭한 상태에서 xml code 파일로 넘어가자. 그리고 소스코드를 아래와 같이 작성해준다.
<androidx.appcompat.widget.Toolbar
        android:id="@+id/toolbar_main_ship_data"
        android:layout_width="0dp"
        android:layout_height="50dp"
        android:background="#F3F3F3"
        android:minHeight="?attr/actionBarSize"
        android:theme="?attr/actionBarTheme"
        app:layout_constraintEnd_toEndOf="parent"
        app:layout_constraintStart_toStartOf="parent"
        tools:ignore="MissingConstraints"
        tools:layout_editor_absoluteY="0dp" />
1. android:layout_width = "0dp"이라는 소스코드를 준 이유는 툴바를 화면의 크기에 딱 맞추기 위해서 이를 0dp로 설정한 것이다.
2. android:layout_height = "50dp"이라는 소스코드는 툴바의 높이다. 몇으로 설정해도 상관은 없다.
3. android:background = "#F3F3F3"이라는 소스코드는 툴바의 색을 지정해 준 것이다.
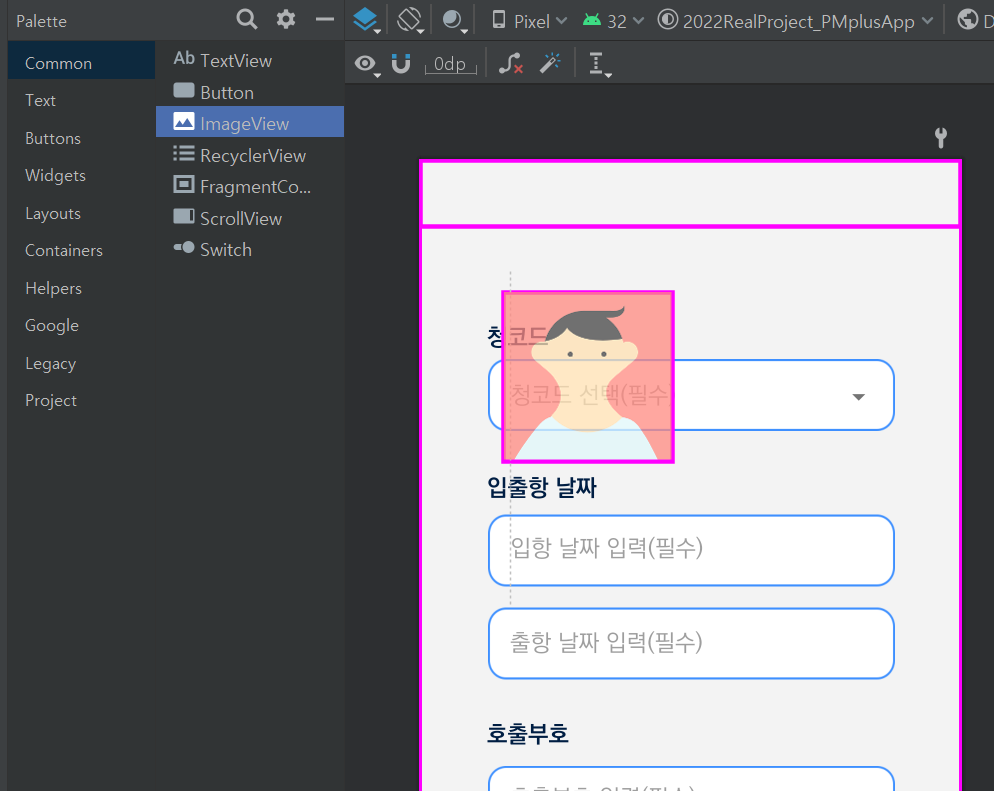
사용자에게 입력받는 4개의 칸을 보면 모두 파란색 테투리로 칠해져있는 네모칸안에서 입력받는 것을 볼 수 있다. 먼저 이를 구현해 줄 것이다. 이번엔 이미지를 가져와보자.
가져오는 방법은 간단하다. 아래 사진처럼 ImageView를 클릭해 끌어오면 된다!
 |
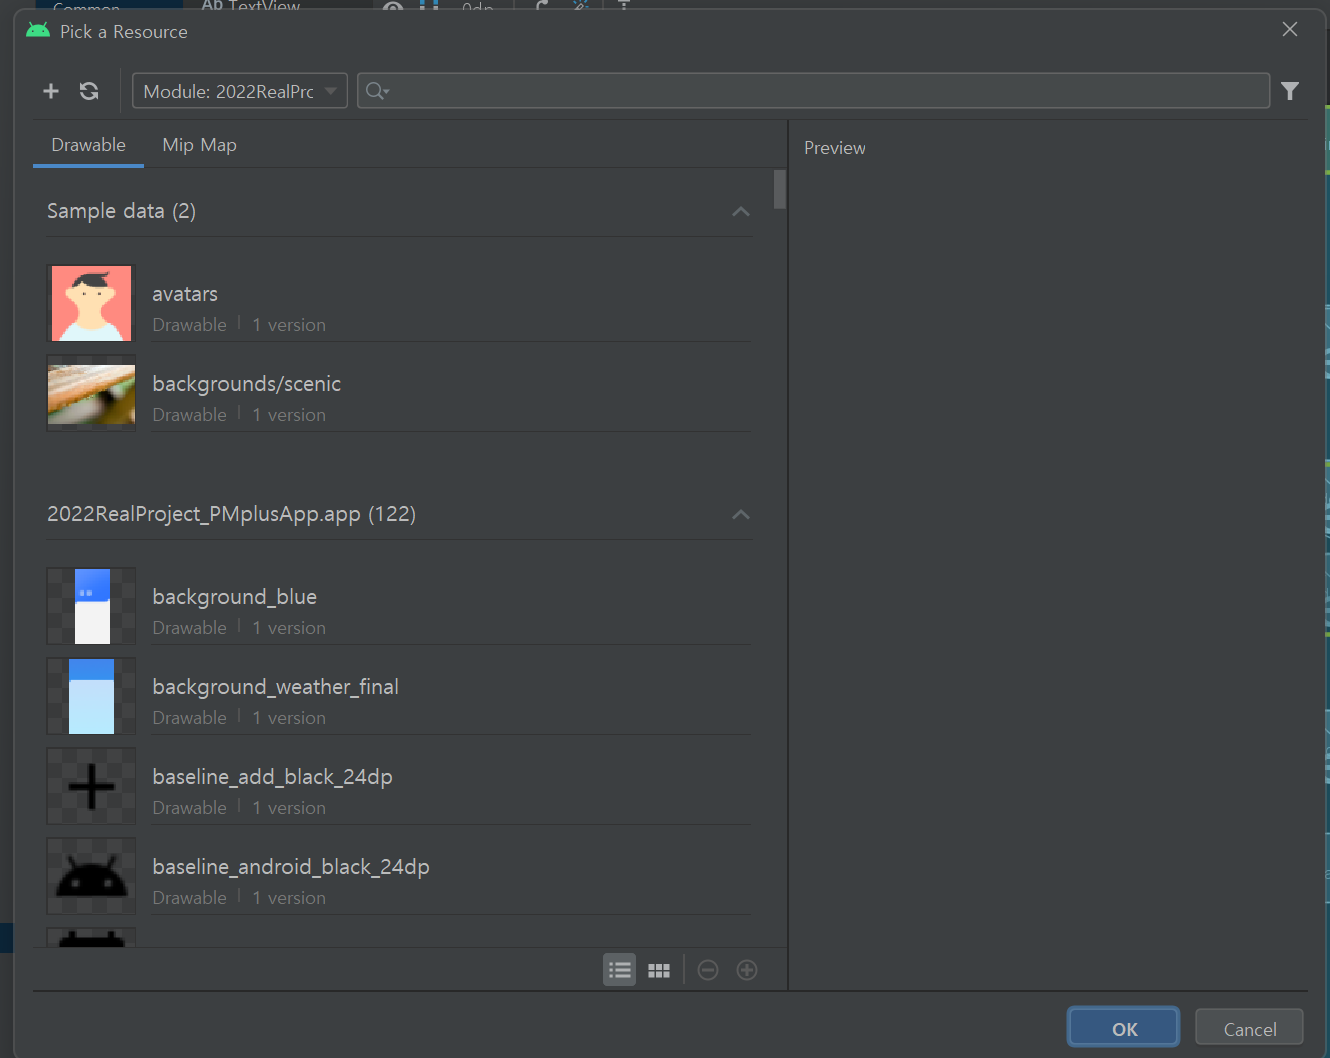 |
그럼 오른쪽처럼 창이 뜰텐데, 거기서 파일을 찾아서 클릭해주면 적용이 된다. 파일명은 "ship_data_write"다.
그럼 이미지가 가져와질텐데 총 4개 가져오면 된다. 이미지의 위치는 꼭 필자와 동일하게 하지 않아도 괜찮다. 간격을 좁히고 싶다면 좁혀도 문제될 건 없다.
그리고 해당 이미지들을 나열했다면 아래와 같이 소스코드를 작성해준다.
 <ImageView
        android:id="@+id/imageView10"
        android:layout_width="310dp"
        android:layout_height="55dp"
        android:scaleType="fitXY"
        android:background="#00ffffff"
        app:layout_constraintBottom_toBottomOf="parent"
        app:layout_constraintEnd_toEndOf="parent"
        app:layout_constraintHorizontal_bias="0.504"
        app:layout_constraintStart_toStartOf="parent"
        app:layout_constraintTop_toTopOf="@+id/toolbar_main_ship_data"
        app:layout_constraintVertical_bias="0.224"
        app:srcCompat="@drawable/text_write" />
위치는 자신이 맞추고 싶은 곳으로 맞추면 된다.
유심히 봐야 할 곳은 android:scaleType과 android:background = "00ffffff"다.
1. android:scaleType 라는 소스코드는 사용자가 가져온 이미지 파일의 크기를 조정할 수 있는 소스코드다. x축과 y축을 사용자가 지정한 크기에 맞출 수 있다. fitXY는 내가 조정한 크기에 꼭 들어맞게 조정한다. 그래서 이 코드를 작성해 준 것이다.
2. android:background = "00ffffff"는 이미지의 배경을 투명하게 해주는 소스코드다. 간혹가다 PNG 파일을 가져오면 뒤에 배경이 회색으로 변하는 경우가 있다. 이를 방지하기 위해 투명색으로 지정하는 코드를 작성한 것이다.
이렇게 4개의 입력칸을 전부 나열했다면 이제 사용자에게 입력받는 칸을 그 안에 넣어주어야 한다.
사용자에게 입력받는 것은 Plain Text를 이용한다. 이것도 끌어오면 된다.

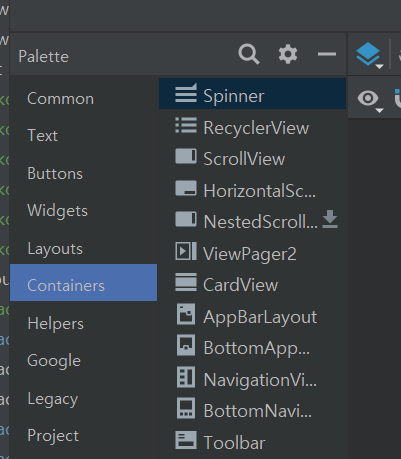
4개 다 끌어오는데, 중요한 것은 맨 위 청코드 같은 경우 사용자가 선택할 수 있도록 기능을 구현했었다. 이 기능은 "Spinner"라고 하는 기능이다. 그렇기에 Spinner도 하나 끌어와주어야 한다.
끌어왔다면 아래 사진과 같이 배치해준다. 노란색이 Plain Text, 빨간색이 Spinner다. 하는 김에 밑에 조회하기 버튼도 끌어와주자. ImageButton을 클릭해 끌어오면 된다. 위에서 했던것과 동일하다.


그리고 Plain text 4개도 scaleType=fitXy와 background:"00ffffff"를 작성해주자. 그래야 보기 좋고 밑에 선이 사라진다.
이제 손을 봐야 할 부분이 총 2개가 남았다. 바로 hint와 id다. id라는 개념이 조금 중요해서 이것부터 시작하겠다.
1-2) ID & Hint
id는 말 그대로 각 요소들을 구분지어주는 역할을 한다. 그래서 이름이 겹치면 안된다!
각 화면에 배치한 버튼들이 어디에 있는지 알 수 있기 때문에 이 id들을 반드시 작성해 주어야 한다.
각 요소들을 구분하기 때문에 java로 각 기능을 구현하는 소스코드를 작성할 때 이 id를 이용해서 작성한다.
id를 작성하는 곳은 아래 이미지와 같다.

| Plain text : et_로 시작 Button 종류 : btn_으로 시작 |
id명을 짓는것은 사용자 마음대로 하면 된다. 하지만 보통 저렇게 많이 작성하는 것 같아서 이것도 알아두면 좋을 것 같다.
필자는 저렇게 작성하고 어떤 클래스의 어떤 기능인지를 명시해 두는 방식으로 작성하였다.
필자가 작성한 id는 다음과 같다.
| 청코드 : et_prtAgCd_ship 입항 날짜: et_sde_ship 출항 날짜: et_ede_ship 호출부호: et_clsgn_ship 툴바: toolbar_main_ship_data 조회하기 버튼 : btn_data_search |
이를 참고해서 id를 작성하면 좋을 것 같다!
힌트는 사용자에게 이곳에 어떤 값을 입력하면 됩니다! 라고 알려주는 기능이라고 생각하면 된다.
흔히, 네이버나 카카오톡에 로그인 할 때 아이디, 비밀번호라고 칸마다 쓰여져 있는데 그 역할을 하는 것이 hint다.
Plain text를 클릭하고 hint라고 쓰여져 있는 곳을 찾아서 작성해주자.

이렇게 한다면 화면 구성은 끝이다! 전체 소스코드는 아래와 같다.
1-3) xml 파일 전체 소스코드
<?xml version="1.0" encoding="utf-8"?>
<androidx.constraintlayout.widget.ConstraintLayout xmlns:android="http://schemas.android.com/apk/res/android"
    xmlns:app="http://schemas.android.com/apk/res-auto"
    xmlns:tools="http://schemas.android.com/tools"
    android:layout_width="match_parent"
    android:layout_height="match_parent"
    android:fitsSystemWindows="true"
    android:background="@drawable/gray_background"
    tools:context=".MainActivity_ShipData">


    <ImageButton
        android:id="@+id/btn_data_search"
        android:layout_width="310dp"
        android:layout_height="52dp"
        android:background="#00ffffff"
        android:scaleType="fitXY"
        app:layout_constraintBottom_toBottomOf="parent"
        app:layout_constraintEnd_toEndOf="parent"
        app:layout_constraintHorizontal_bias="0.504"
        app:layout_constraintStart_toStartOf="parent"
        app:layout_constraintTop_toTopOf="parent"
        app:layout_constraintVertical_bias="0.815"
        app:srcCompat="@drawable/ship_data_inquiry" />

    <androidx.appcompat.widget.Toolbar
        android:id="@+id/toolbar_main_ship_data"
        android:layout_width="0dp"
        android:layout_height="50dp"
        android:background="#F3F3F3"
        android:minHeight="?attr/actionBarSize"
        android:theme="?attr/actionBarTheme"
        app:layout_constraintEnd_toEndOf="parent"
        app:layout_constraintStart_toStartOf="parent"
        tools:ignore="MissingConstraints"
        tools:layout_editor_absoluteY="0dp" />

    <TextView
        android:id="@+id/textView13"
        android:layout_width="wrap_content"
        android:layout_height="wrap_content"
        android:fontFamily="@font/kopubworld_dotum_pro_bold"
        android:text="청코드"
        android:textColor="#001E43"
        android:textSize="18sp"
        android:textStyle="bold"
        app:layout_constraintBottom_toBottomOf="parent"
        app:layout_constraintEnd_toEndOf="parent"
        app:layout_constraintHorizontal_bias="0.138"
        app:layout_constraintStart_toStartOf="parent"
        app:layout_constraintTop_toTopOf="@+id/toolbar_main_ship_data"
        app:layout_constraintVertical_bias="0.173" />

    <TextView
        android:id="@+id/textView14"
        android:layout_width="wrap_content"
        android:layout_height="wrap_content"
        android:fontFamily="@font/kopubworld_dotum_pro_bold"
        android:text="입출항 날짜"
        android:textColor="#001E43"
        android:textSize="18sp"
        android:textStyle="bold"
        app:layout_constraintBottom_toBottomOf="parent"
        app:layout_constraintEnd_toEndOf="parent"
        app:layout_constraintHorizontal_bias="0.153"
        app:layout_constraintStart_toStartOf="parent"
        app:layout_constraintTop_toTopOf="@+id/toolbar_main_ship_data"
        app:layout_constraintVertical_bias="0.336" />

    <TextView
        android:id="@+id/textView15"
        android:layout_width="wrap_content"
        android:layout_height="wrap_content"
        android:fontFamily="@font/kopubworld_dotum_pro_bold"
        android:text="호출부호"
        android:textColor="#001E43"
        android:textSize="18sp"
        android:textStyle="bold"
        app:layout_constraintBottom_toBottomOf="parent"
        app:layout_constraintEnd_toEndOf="parent"
        app:layout_constraintHorizontal_bias="0.144"
        app:layout_constraintStart_toStartOf="parent"
        app:layout_constraintTop_toTopOf="parent"
        app:layout_constraintVertical_bias="0.603" />

    <ImageView
        android:id="@+id/imageView10"
        android:layout_width="310dp"
        android:layout_height="55dp"
        android:scaleType="fitXY"
        android:background="#00ffffff"
        app:layout_constraintBottom_toBottomOf="parent"
        app:layout_constraintEnd_toEndOf="parent"
        app:layout_constraintHorizontal_bias="0.504"
        app:layout_constraintStart_toStartOf="parent"
        app:layout_constraintTop_toTopOf="@+id/toolbar_main_ship_data"
        app:layout_constraintVertical_bias="0.224"
        app:srcCompat="@drawable/text_write" />

    <ImageView
        android:id="@+id/imageView12"
        android:layout_width="310dp"
        android:layout_height="55dp"
        android:scaleType="fitXY"
        android:background="#00ffffff"
        app:layout_constraintBottom_toBottomOf="parent"
        app:layout_constraintEnd_toEndOf="parent"
        app:layout_constraintHorizontal_bias="0.504"
        app:layout_constraintStart_toStartOf="parent"
        app:layout_constraintTop_toTopOf="@+id/toolbar_main_ship_data"
        app:layout_constraintVertical_bias="0.399"
        app:srcCompat="@drawable/text_write" />

    <ImageView
        android:id="@+id/imageView13"
        android:layout_width="310dp"
        android:layout_height="55dp"
        android:scaleType="fitXY"
        android:background="#00ffffff"
        app:layout_constraintBottom_toBottomOf="parent"
        app:layout_constraintEnd_toEndOf="parent"
        app:layout_constraintHorizontal_bias="0.504"
        app:layout_constraintStart_toStartOf="parent"
        app:layout_constraintTop_toTopOf="@+id/toolbar_main_ship_data"
        app:layout_constraintVertical_bias="0.504"
        app:srcCompat="@drawable/text_write" />

    <EditText
        android:id="@+id/et_sde_ship"
        android:layout_width="277dp"
        android:layout_height="53dp"
        android:background="#00ffffff"
        android:ems="10"
        android:fontFamily="@font/kopubworld_dotum_pro_medium"
        android:hint="입항 날짜 입력(필수)"
        android:inputType="textPersonName"
        app:layout_constraintBottom_toBottomOf="@+id/imageView12"
        app:layout_constraintEnd_toEndOf="@+id/imageView12"
        app:layout_constraintHorizontal_bias="0.515"
        app:layout_constraintStart_toStartOf="@+id/imageView12"
        app:layout_constraintTop_toTopOf="@+id/imageView12"
        app:layout_constraintVertical_bias="0.0" />

    <EditText
        android:id="@+id/et_ede_ship"
        android:layout_width="277dp"
        android:layout_height="53dp"
        android:background="#00ffffff"
        android:ems="10"
        android:fontFamily="@font/kopubworld_dotum_pro_medium"
        android:hint="출항 날짜 입력(필수)"
        android:inputType="textPersonName"
        app:layout_constraintBottom_toBottomOf="@+id/imageView13"
        app:layout_constraintEnd_toEndOf="@+id/imageView13"
        app:layout_constraintStart_toStartOf="@+id/imageView13"
        app:layout_constraintTop_toTopOf="@+id/imageView13" />

    <ImageView
        android:id="@+id/imageView17"
        android:layout_width="310dp"
        android:layout_height="55dp"
        android:background="#00ffffff"
        app:layout_constraintBottom_toBottomOf="parent"
        app:layout_constraintEnd_toEndOf="parent"
        app:layout_constraintHorizontal_bias="0.504"
        app:layout_constraintStart_toStartOf="parent"
        app:layout_constraintTop_toTopOf="@+id/toolbar_main_ship_data"
        app:layout_constraintVertical_bias="0.68"
        app:srcCompat="@drawable/text_write" />

    <EditText
        android:id="@+id/et_clsgn_ship"
        android:layout_width="277dp"
        android:layout_height="53dp"
        android:background="#00ffffff"
        android:ems="10"
        android:fontFamily="@font/kopubworld_dotum_pro_medium"
        android:hint="호출부호 입력(필수)"
        android:inputType="textPersonName"
        app:layout_constraintBottom_toBottomOf="@+id/imageView17"
        app:layout_constraintEnd_toEndOf="@+id/imageView17"
        app:layout_constraintHorizontal_bias="0.515"
        app:layout_constraintStart_toStartOf="@+id/imageView17"
        app:layout_constraintTop_toTopOf="@+id/imageView17"
        app:layout_constraintVertical_bias="0.0" />

    <Spinner
        android:id="@+id/spinner"
        android:layout_width="68dp"
        android:layout_height="53dp"
        app:layout_constraintBottom_toBottomOf="parent"
        app:layout_constraintEnd_toEndOf="parent"
        app:layout_constraintHorizontal_bias="0.842"
        app:layout_constraintStart_toStartOf="parent"
        app:layout_constraintTop_toTopOf="@+id/toolbar_main_ship_data"
        app:layout_constraintVertical_bias="0.227" />

    <TextView
        android:id="@+id/et_prtAgCd_ship"
        android:layout_width="221dp"
        android:layout_height="53dp"
        android:fontFamily="@font/kopubworld_dotum_pro_medium"
        android:gravity="center_vertical"
        android:hint="청코드 선택(필수)"
        android:textSize="18sp"
        app:layout_constraintBottom_toBottomOf="@+id/imageView10"
        app:layout_constraintEnd_toEndOf="@+id/imageView10"
        app:layout_constraintHorizontal_bias="0.191"
        app:layout_constraintStart_toStartOf="@+id/imageView10"
        app:layout_constraintTop_toTopOf="@+id/imageView10"
        app:layout_constraintVertical_bias="1.0" />


</androidx.constraintlayout.widget.ConstraintLayout>
2) JAVA로 기능을 코딩하자
이제 각 요소들이 기능으르 할 수 있도록 만들어 줄 차례다. java 소스코드 파일로 이동하자.
이동하면 빈 화면이 보일텐데, 이제 여기서 소스코드를 작성하면 된다.
먼저 필요한 변수를 선언해주자. 변수는 전역변수로 선언한다.
Toolbar  toolbar;
    TextView shipcode;
    EditText shipday1;
    EditText shipday2;
    EditText codecall;

    ImageButton gofind;

    String[] items = {"000 해양수산부","010 해양수산부-해양수산부","020 부산", "021 감천", "022 부산신항","030 인천","031 평택",
            "032 인천연안", "034 용기포", "035 연평도", "040 서울", "050경인","090 불개항-불개항청","200 동해","201 삼척", "202 묵호",
            "203 속초","204 옥계","206 호산","300 대산","301 보령","302 태안","303 당진화력","304 보령출장소","500 군산", "501 장항", "502 고정",
            "503 상왕등도", "601 흑산도","602 가거항리", "610 목포", "611 완도","616 대불분실", "617 북항분실", "620 여수", "621 여천",
            "622 광양","626 월내","627 중흥", "629 중흥", "630 여수", "631 거문도", "700 포항", "701 포항신항", "702 영일만항", "703 후포",
            "704 울릉도동", "705 울릉사동", "810 마산", "811 삼천포", "812 옥포", "813 장승포", "814 진해", "815 통영",
            "816 고현", "817 하동", "818 국도", "820 울산", "821 온산", "822 마포", "900 제주", "901 서귀포", "902 추자",
            "903 화순", "951 기타항-북한", "998 기타-통계기타항", "BO1 수산물품질관리원", "F99 수산물품질관리원", "FMC 수산물품질관리원",
            "G13 수산물품질관리원","I02 수산물품질관리원","IO3 수산물품질관리원","J06 수산물품질관리원","J10 수산물품질관리원","J14 수산물품질관리원",
            "M07 수산물품질관리원","P05 수산물품질관리원","P12 수산물품질관리원","S04 수산물품질관리원","T11 수산물품질관리원","WO8 수산물품질관리원",
            "Y09 수산물품질관리원"};
Toolbar는 Toolbar, Plain Text는 EditText로 ImageButton은 ImageButton으로 자료형을 선언해준다.
밑에 있는 배열은 Spinner에 적용시킬 것이다. 이것은 기니까 복사 붙여넣기 하자.
그리고 여기 안에 코드를 작성해주면 된다!
 @Override
    protected void onCreate(Bundle savedInstanceState) {
        super.onCreate(savedInstanceState);
        setContentView(R.layout.activity_main_ship_data);
먼저 Toolbar에 사용자가 현재 어떤 화면에 들어와 있는지를 표시 해 줄것이다. 그러기 위해선 내가 만든 화면의 Toolbar를 불러와야 한다. 이때 사용하는 명령어는 findViewById다.
toolbar = (Toolbar)findViewById(R.id.toolbar_main_ship_data); //툴바 선언위에서 우리가 선언한 id를 이용해서 해당 화면의 툴바를 불러온다. 그 다음에 툴바가 보이도록 설정해주고, 툴바에 보일 글씨와 아이콘을 입력해준다.
 setSupportActionBar(toolbar); //툴바를 불러오고

 Objects.requireNonNull(getSupportActionBar()).setDisplayHomeAsUpEnabled(true);
 getSupportActionBar().setHomeAsUpIndicator(R.drawable.before);
 getSupportActionBar().setTitle("선박 입출항 조회");
getSupportActionBar().setHomeAsUpIndicator(R.drawable.before);은 아이콘을 설정 해 준 것이다.
getSupportActionBar().setTitle은 제목을 입력하는 것이다.
그럼 툴바 작업은 끝난것이다. 이제 Spinner를 만들어보자
Spinner도 자료형은 Spinner다.
Spinner spinner = findViewById(R.id.spinner);그리고 Spinner를 이용해 값을 선택했을 때 이를 저장할 변수를 불러와준다. 이는 우리가 Spinner 옆에 만들어 두었던 EditText가 되겠다. 이도 불러와주자
shipcode = findViewById(R.id.et_prtAgCd_ship);Spinner는 어댑터 라는 것을 이용해서 구현을 하는데, 형식은 다음과 같다.
ArrayAdapter<자료형> adapter = new ArrayAdapter<자료형>(
this,android.R.layout.스피너를 어떻게 보여줄 것인지(형식), 데이터
);
spinner.setAdapter(adapter); //만든 스피너 변수에 어댑터 지정
spinner.setOnItemSelectedListener(new AdapterView.OnItemSelectedListener() {
@Override
public void onItemSelected(AdapterView<?> parent, View view, int position, long id) {
//데이터 선택시 어떻게 이를 적용 시킬 것인지
}
@Override
public void onNothingSelected(AdapterView<?> parent) {
//아무것도 선택하지 않았을 때 사용자에게 보여줄 기본값
}
});우리는 위에서 배열을 이용해서 데이터를 나열해 주었고, 필요한 변수들도 만들어두었다. 그리고 우리가 보여줄 자료는 문자열 형식이기 때문에 아래와 같이 소스코드를 작성하면 된다.
 ArrayAdapter<String> adapter = new ArrayAdapter<String>(
                this,android.R.layout.simple_spinner_dropdown_item, items
        );

        spinner.setAdapter(adapter);
        spinner.setOnItemSelectedListener(new AdapterView.OnItemSelectedListener() {
            @Override
            public void onItemSelected(AdapterView<?> parent, View view, int position, long id) {
                shipcode.setText(items[position]);
            }

            @Override
            public void onNothingSelected(AdapterView<?> parent) {

            }
        });
dropdown 형식은 줄 칸으로 나누어 사용자에게 보여주도록 하는 형식이다. 그리고 사용자가 값을 선택 시 이것이 text에 적용이 되도록 하였다. setText가 editText의 값을 변환시켜주는 역할을 한다.
그럼 이제 사용자가 입력한 값들을 가져오는 코드를 작성해보자.
나머지 3개 id를 불러와준다.
shipday1 = (EditText)findViewById(R.id.et_sde_ship); //시작날짜

shipday2 = (EditText)findViewById(R.id.et_ede_ship); //종료날짜, 필수

codecall = (EditText)findViewById(R.id.et_clsgn_ship); //호출부호

gofind = (ImageButton)findViewById(R.id.btn_data_search);
우리가 구현할 것은 사용자가 조회 버튼을 눌렀을 때 그 값들을 받아낸 다음 결과 화면으로의 전환과 함께 그 값들을 넘겨주고 관련된 API와 연결해 값들을 가져오는 것이다.
버튼을 눌렀을 때 라는 명령어는 setOnclickListener를 이용한다.
특정 이벤트가 발생할 때 이 기능을 수행하겠다는 뜻이다.
gofind.setOnClickListener(v -> { //조회 버튼이 눌렸을 때 입력받은 값을 결과화면으로 보내고 화면 전환

            String data = shipcode.getText().toString();
            String Shipcode = data.substring(0,3);
            String Shipday1 = shipday1.getText().toString().trim();
            String Shipday2 = shipday2.getText().toString().trim();
            String Codecall = codecall.getText().toString().trim(); //호출부호


            Intent intent = new Intent(MainActivity_ShipData.this, MainActivity_Shipdata_Result.class);

            intent.putExtra("prt",Shipcode); // 020
            intent.putExtra("sde",Shipday1);
            intent.putExtra("ede",Shipday2);
            intent.putExtra("clsgnll",Codecall);

            startActivity(intent);
       });

        //데이터 출력하는 건 결과 화면에서..
  }
그리고 따로 변수를 선언해서 이를 문자열로 변경해준다. getText()가 editText에서 사용자가 입력한 값을 가져오는 역할을 한다. toString()은 아시겠지만 문자열로 변환하는 역할을 한다.
ShipCode같은 경우 맨 앞 부분 ~ 3번째 까지가 API를 불러오는데 필요한 코드이기 때문에 subString을 이용해 그 문자열만 잘라내 주었다.
Intent는 화면을 전환하거나 변수를 다른 화면으로 보낼 때 사용하는 기능이다! 이 기능은 굉장히 유용하다.
형식은 Intent 변수명 = new Intent(현재 화면 이름, 이동할 화면 이름.class);다.
그리고 putExtra 라는 것을 이용해서 다른 화면으로 정보를 보내주는데 괄호 앞에 있는 것이 이벤트 이름이다.
즉, 어떤 화면에서 이 코드를 보내왔는지 확인하기 위해 작성하는 것이라고 보면 된다.
이벤트 명을 적어두고, 그 뒤에는 어떤 변수값을 보낼것인지 작성해주면 된다.startActivity(intent);는 해당 이벤트를 진행한다는 명령어다.
이제 마지막으로, Toolbar에 있는 뒤로가기 버튼을 눌렀을 때 홈으로 이동하게 하는 코드를 작성해준다. 이는 함수 형식으로 입력한다. 아마 지금 메인 화면을 안만들어서 에러가 날 수도 있고, 작동하지 않을 수도 있다.
메인 화면은 다음 포스팅 때 만들어 보겠다.
@Override
    public boolean onOptionsItemSelected(MenuItem item) { //뒤로가기 했을 때
        switch (item.getItemId()){
            case android.R.id.home:
                finish();
                return true;
            default:
                break;
        }
        return super. onOptionsItemSelected(item);
    }
전체 소스코드는 다음과 같다.
package com.example.a2022realproject_pmplusapp;

import androidx.appcompat.app.AppCompatActivity;
import androidx.appcompat.widget.Toolbar;


import android.content.Intent;
import android.os.Bundle;

import android.view.MenuItem;
import android.view.View;
import android.widget.AdapterView;
import android.widget.ArrayAdapter;
import android.widget.EditText;
import android.widget.ImageButton;
import android.widget.Spinner;
import android.widget.TextView;

import java.util.Objects;


public class MainActivity_ShipData extends AppCompatActivity {


    Toolbar  toolbar;
    TextView shipcode;
    EditText shipday1;
    EditText shipday2;
    EditText codecall;

    ImageButton gofind;

    String[] items = {"000 해양수산부","010 해양수산부-해양수산부","020 부산", "021 감천", "022 부산신항","030 인천","031 평택",
            "032 인천연안", "034 용기포", "035 연평도", "040 서울", "050경인","090 불개항-불개항청","200 동해","201 삼척", "202 묵호",
            "203 속초","204 옥계","206 호산","300 대산","301 보령","302 태안","303 당진화력","304 보령출장소","500 군산", "501 장항", "502 고정",
            "503 상왕등도", "601 흑산도","602 가거항리", "610 목포", "611 완도","616 대불분실", "617 북항분실", "620 여수", "621 여천",
            "622 광양","626 월내","627 중흥", "629 중흥", "630 여수", "631 거문도", "700 포항", "701 포항신항", "702 영일만항", "703 후포",
            "704 울릉도동", "705 울릉사동", "810 마산", "811 삼천포", "812 옥포", "813 장승포", "814 진해", "815 통영",
            "816 고현", "817 하동", "818 국도", "820 울산", "821 온산", "822 마포", "900 제주", "901 서귀포", "902 추자",
            "903 화순", "951 기타항-북한", "998 기타-통계기타항", "BO1 수산물품질관리원", "F99 수산물품질관리원", "FMC 수산물품질관리원",
            "G13 수산물품질관리원","I02 수산물품질관리원","IO3 수산물품질관리원","J06 수산물품질관리원","J10 수산물품질관리원","J14 수산물품질관리원",
            "M07 수산물품질관리원","P05 수산물품질관리원","P12 수산물품질관리원","S04 수산물품질관리원","T11 수산물품질관리원","WO8 수산물품질관리원",
            "Y09 수산물품질관리원"};

    @Override
    protected void onCreate(Bundle savedInstanceState) {
        super.onCreate(savedInstanceState);
        setContentView(R.layout.activity_main_ship_data);


        toolbar = (Toolbar)findViewById(R.id.toolbar_main_ship_data); //툴바 선언
        setSupportActionBar(toolbar); //툴바를 불러오고

        Objects.requireNonNull(getSupportActionBar()).setDisplayHomeAsUpEnabled(true);
        getSupportActionBar().setHomeAsUpIndicator(R.drawable.before);
        getSupportActionBar().setTitle("선박 입출항 조회");


        Spinner spinner = findViewById(R.id.spinner);
        shipcode = findViewById(R.id.et_prtAgCd_ship);

        ArrayAdapter<String> adapter = new ArrayAdapter<String>(
                this,android.R.layout.simple_spinner_dropdown_item, items
        );

        spinner.setAdapter(adapter);
        spinner.setOnItemSelectedListener(new AdapterView.OnItemSelectedListener() {
            @Override
            public void onItemSelected(AdapterView<?> parent, View view, int position, long id) {
                shipcode.setText(items[position]);
            }

            @Override
            public void onNothingSelected(AdapterView<?> parent) {

            }
        });


        //shipcode = (EditText)findViewById(R.id.et_prtAgCd_ship); //청코드, 필수

        shipday1 = (EditText)findViewById(R.id.et_sde_ship); //시작날짜

        shipday2 = (EditText)findViewById(R.id.et_ede_ship); //종료날짜, 필수

        codecall = (EditText)findViewById(R.id.et_clsgn_ship); //호출부호


        gofind = (ImageButton)findViewById(R.id.btn_data_search);

        gofind.setOnClickListener(v -> { //조회 버튼이 눌렸을 때 입력받은 값을 결과화면으로 보내고 화면 전환

            String data = shipcode.getText().toString();
            String Shipcode = data.substring(0,3);
            String Shipday1 = shipday1.getText().toString().trim();
            String Shipday2 = shipday2.getText().toString().trim();
            String Codecall = codecall.getText().toString().trim(); //호출부호


            Intent intent = new Intent(MainActivity_ShipData.this, MainActivity_Shipdata_Result.class);

            intent.putExtra("prt",Shipcode); // 020
            intent.putExtra("sde",Shipday1);
            intent.putExtra("ede",Shipday2);
            intent.putExtra("clsgnll",Codecall);

            startActivity(intent);
       });

        //데이터 출력하는 건 결과 화면에서..
  }

    @Override
    public boolean onOptionsItemSelected(MenuItem item) { //뒤로가기 했을 때
        switch (item.getItemId()){
            case android.R.id.home:
                finish();
                return true;
            default:
                break;
        }
        return super. onOptionsItemSelected(item);
    }


}
끝!
'프론트앤드' 카테고리의 다른 글
| [안드로이드 스튜디오] Hilt에 대해 알아보자(1) - 종속 항목 삽입이 뭔데? (2) | 2024.07.18 |
|---|---|
| [안드로이드 스튜디오] ProgressBar가..죽었네? 로딩창 직접 만들자 (0) | 2024.07.01 |
| [안드로이드 스튜디오] include 태 그 조 아. (1) | 2024.03.03 |
| 안드로이드 스튜디오 - 리사이클러뷰를 이용해서 사용자가 입력한 값 대로 공공데이터 포털 API에서 결과값 가져오기 - (2) (0) | 2023.06.24 |
| 선박 입출항 조회 기능 영상 (0) | 2023.01.17 |


